The first purpose of this blog is to demonstrate the model building approach commonly known as Box-Jenkins or ARIMA methodology. (ARIMA stands for autoregressive integrated moving average.) The second purpose is to demonstrate how forecasts can be produced from the fitted ARIMA model.
This blog uses a time series consisting of 75 observations. I call this time series Yt, which is normal for forecasting models. What this means is that observations were collected over time and entered into the computer (Minitab) in chronological order.
The time series is examined first using autocorrelation and partial autocorrelation functions. This preliminary examination suggests that an autoregressive model of order 1 fits the data. This autoregressive model of order 1, also known as an AR(1) model, is built and coefficients are estimated. The model's adequacy is verified using a number of diagnostic tests to ensure that the residuals are random, normally distributed, and contain few outliers. Then, four forecasts are made.
Below is the time series plot of Yt.

2. Identifying a Model to be Tentatively Entertained:
To identify a potential model using the Box-Jenkins methodology, we begin by producing both the autocorrelation function and the partial autocorrelation function for the original time series data. Then, these two graphical outputs are compared with theoretical graphical outputs to see if a match between them can be found. This matching process helps narrow down which kind of model we should build. We have numerous options such as building an autoregressive model, a moving average model, a mixed model, a differenced data model, and even a model with seasonal components. We have more options, for example, we could pick an autoregressive model of order 1, or of order 2, or of order 3 depending on the number of terms we want to include on the right-hand side of the equation. Therefore, we use this graphical matching process in order to reduce the number of options that we need to consider.
The autocorrelation function is a graphical display of various autocorrelation coefficients for various time lags. An autocorrelation coefficient is a measure of correlation between two variables: the original time series variable and the lagged version of this same time series variable. For example, a lag 2 autocorrelation coefficient is a measure of correlation between the original data and the original data lagged two periods. For monthly data, lagging two periods means that we shift an observation from January to March and that we shift an observation from February to April and so on. A lag 3 autocorrelation would involve shifting an observation from January to April and would involve shifting an observation from February to May. The graph puts the various time lags on the horizontal axis and plots the autocorrelation coefficients as black lines extending upward or downward. The autocorrelation coefficients are the little black lines that stick up or down and they appear all the way across the middle section of the graph.
The partial autocorrelation function is conceptually very similar to the autocorrelation function. It too is a graphical output containing various partial autocorrelation coefficients computed for various time lags. Again, the various time lags are put along the horizontal axis and the partial autocorrelation coefficients are plots as black lines extending upward or downward. Moreover, a partial autocorrelation coefficient can be thought of as a correlation between the original time series data and a lagged version of the time series data. The difference between the partial autocorrelation coefficients and the autocorrelation coefficients is that the partial autocorrelation coefficients are computed in such a way that the effects of the intervening time lags are taken into account. So for example, a partial autocorrelation coefficient at time lag 12 is the correlation between the original time series and the time series lagged 12 periods and we have adjusted for the effects of the intervening values, i.e., we have adjusted for the effects of the lagged 1 through lagged 11 data.
Here are the autocorrelation and partial autocorrelation functions for the original time series data. The most striking feature of these two plots is the strongly negative (downward pointing) partial autocorrelation coefficient at lag 1. Then, the rest of the partial autocorrelation coefficients are all very small and close to zero, i.e., the black lines at the other time lags are all very short. This is suggestive of an autoregressive model of order 1, usually abbreviated AR(1). The reason it is suggestive is because I compared this partial autocorrelation function to the theoretical graphs from a book that I have and this picture is classified under the AR(1) function.


3. Estimating Parameters in the Tentatively Entertained Model:
To estimate the autoregressive model of order 1, or AR(1), I utilize Minitab's ARIMA program. The computer ran 7 iterations and then estimated the parameters of the model. The Minitab results are presented next.
Final Estimates of Parameters
Type Coef SE Coef T P
AR 1 -0.5376 0.0986 -5.45 0.000
Constant 115.829 1.356 85.42 0.000
Mean 75.3310 0.8818
Minitab has estimated the following equation:
Yt = φ0 + φ1Yt - 1 + εt
Minitab also estimates the values of the coefficients. The estimated values of the coefficients are:
φ0 = 115.829
Finally, using these coefficient estimates, we can easily derive the forecasting function. (In regression terminology, this would be called the Y-hat function). We can use this function to forecast future values of Yt. Of course, first we will have to verify that the AR(1) model is adequate. This forecasting function is:
Y(forecast)t = 115.829 – 0.5376 Yt - 1
4. Diagnostic Checking:
A number of tests have to be run in order to make sure that the model is satisfactory. We want to ensure that the residuals of this AR(1) model are random. Moreover, we also want to make sure that the residuals are normally distributed and that they contain few outliers. The individual residual autocorrelations have to be checked to make sure that they are small and close to zero. An overall test of model adequacy is provided by the chi-square test based on the Ljung-Box Q statistic. This overall test looks at the sizes of the residual autocorrelations as a group. (It is a portmanteau test).
The first test that I run is the Modified Box-Pierce or Ljung-Box chi-square test. This test checks a number of residual autocorrelations simultaneously to see whether they are all random or not. If the p value is small, i.e., less than 0.05, the model is considered inadequate. Since this test at lags 12, 24, 36, and 48 has p-values that are all much larger than 0.05, the model can be deemed adequate. What this test is telling us is that a set of residual autocorrelations is not significantly different from what we would expect to find when looking at a set of random residuals. In other words, the residuals are random.
Modified Box-Pierce (Ljung-Box) Chi-Square statistic
Lag 12 24 36 48
Chi-Square 9.3 29.8 37.2 58.2
DF 10 22 34 46
P-Value 0.508 0.124 0.324 0.107
The next graph is the autocorrelation function of the residuals. This plot shows the individual residual autocorrelations. The 95% confidence limit is used to test whether a residual autocorrelation coefficient is significantly different from zero. A residual autocorrelation coefficient would be significantly different from zero if the black line were to extend upward of downward and penetrate through one of the confidence intervals (the red lines). Since this never happens in this plot, we can again conclude that the residuals are random; the residual autocorrelations are not significantly different from zero.

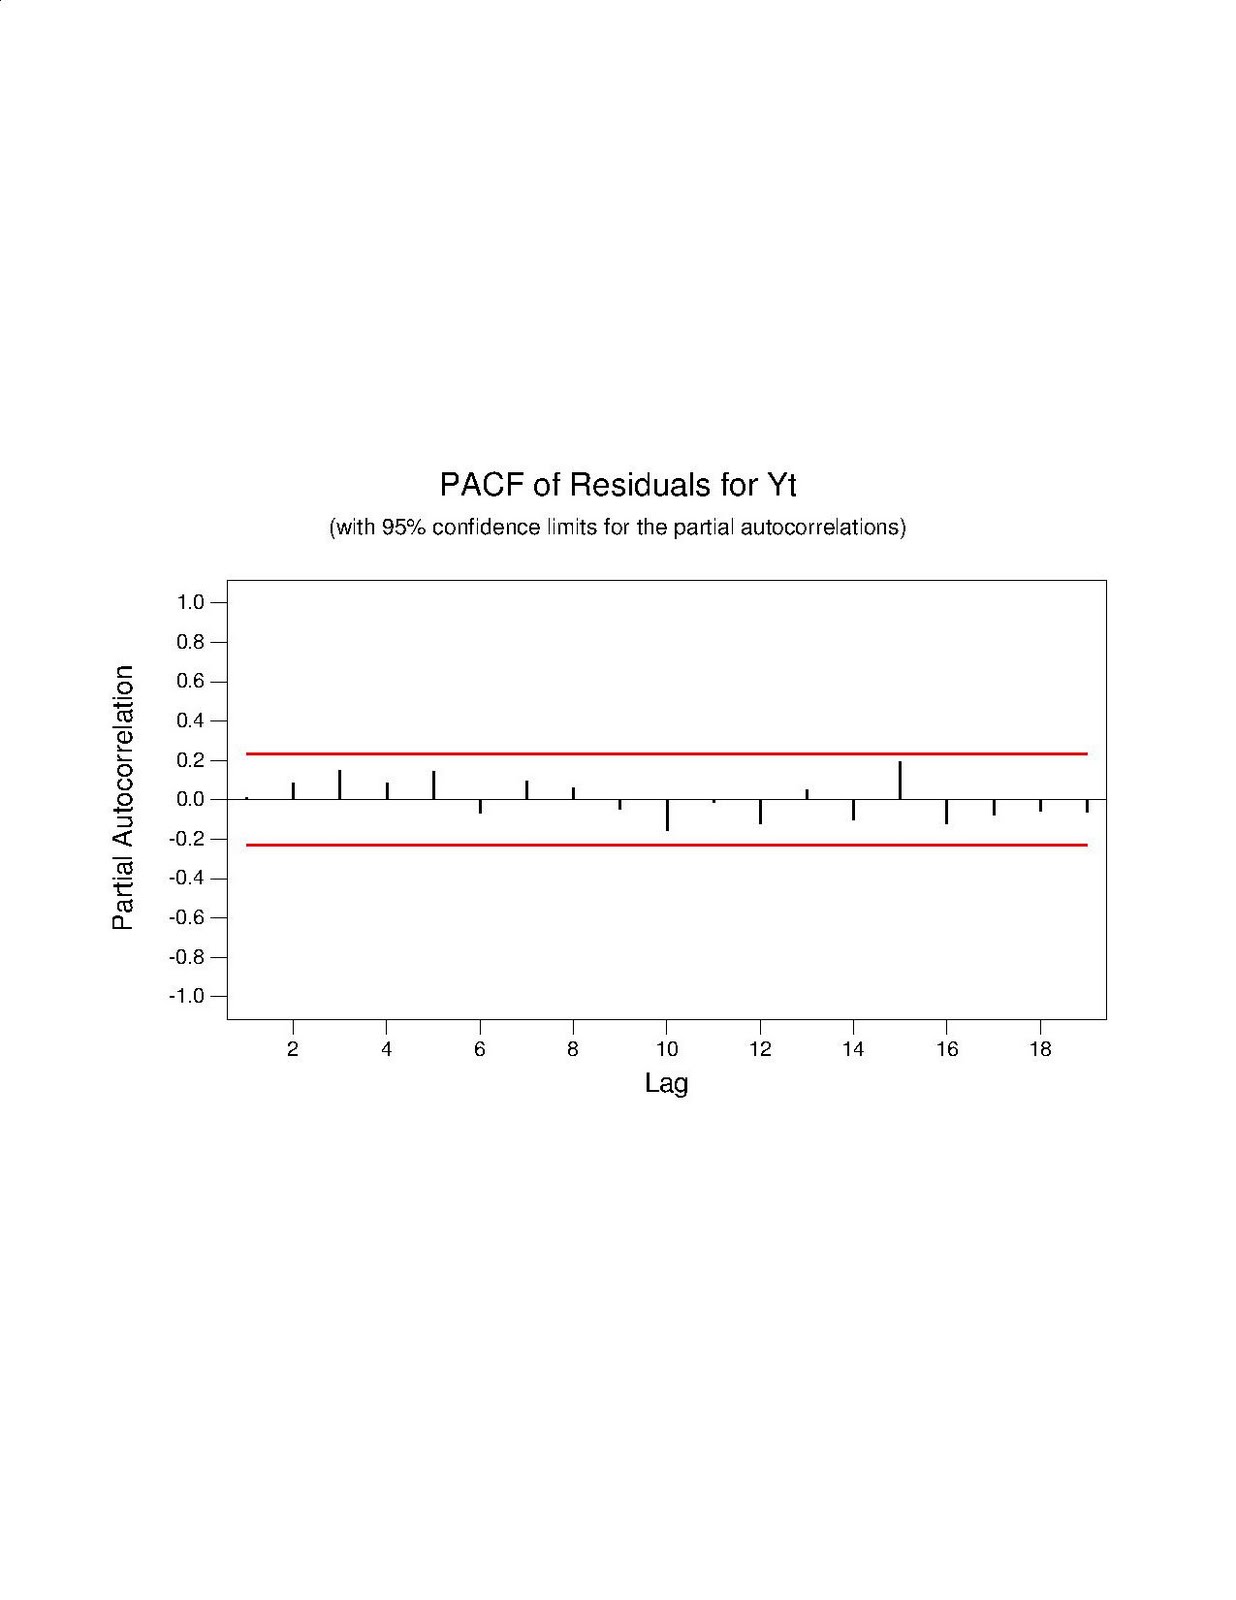
The next graph is the partial autocorrelation function of the residuals. We interpret it using the same general rules that are used for the autocorrelation function. If a black line penetrated through a red line we have to worry because this suggests non-random residuals. If the black lines do not penetrate through the red lines then we most likely have random residuals. We can again conclude that the residuals from this graph.
The next two graphs are used to check the residuals for normality. The normal probability plot is a visual way of checking for normality. If the residuals are normally distributed, then the plot should appear to fall along a straight line. If many residuals diverge radically from the straight line then the residuals are non-normal. The Anderson-Darling Normality test is another way to check the residuals for normality. This test has a null hypothesis that says that the residuals follow a normal distribution. Since the p-value for this test is 0.539, we fail to reject the null hypothesis and conclude that the residuals are most likely normally distributed.


The last test that I run is to plot the residuals against the order of the data. Notice that almost all of the residuals are clustered around 0, plus or minus 20. This is an encouraging sign because we expect that the average value of the residuals should be zero and the residuals should have a constant variance across time. There are only a few residuals that deviate outside of this band. This suggests that few residuals could be classified as outliers. We want to have few outliers; this plot confirms that we have few of them.

5. Using the AR(1) Model for Forecasting:
Since the model passed the diagnosis phase, it can be used to develop forecasts of future values. I once again use Minitab to produce four forecasts. The data in the original time series ran from time period 1 to time period 75. Consequently, the four forecasts are made for time periods 76, 77, 78, and 79. The results are presented next.
Forecasts from period 75
95 Percent Limits
Period Forecast Lower Upper Actual
76 77.122 54.102 100.142
77 74.368 48.232 100.504
78 75.849 48.879 102.818
79 75.053 47.847 102.258
The forecasts and presented in the second column above. The 95% limits give us a range of values for these forecasts because the forecasts contain a degree of uncertainty. For example, the forecast for time period 76 is 77.122. However, the 95% limit tells us that the actual value could very likely fall somewhere in between 54 and 100. This spread of possible values warns the user to keep in mind that the 77.122 figure is not to be taken as an unquestionable truth. It is simply a point estimate that solves the AR(1) equation.
how to perform iterations to estimate parameter in ARIMA?? I'm really confused..
ReplyDeleteThanks B4